Today, I'm releasing Markov Contact, an experiment in dynamic music visualisation. I wanted to take some of the concepts from my earlier Markov Technology a lot further, particularly in terms of the complexity of the visualisations and the level of interactivity. The rest of this post will be talking about the process of making it, so you may want to go try it out first.
I started with the idea for just doing a successor to Markov Technology, a project where I made an endless randomly arranged version of a somewhat repetitive song using a Markov chain. I'd been listening to First Contact by Keiji Yamagishi of Ninja Gaiden fame while working sometimes, and I found myself often wishing I had an endless version. I figured it would be a lot easier the second time around because most of the lessons I learned the hard way could be avoided, However, as I got into it I found some important differences and opportunities to do something more ambitious.
My process for the music was almost identical: first, listen to the song a few times to get an idea of the overall structure, then go through and mark all the sections (verse 1, chorus, bridge etc), then further split each section into subsections (usually a bar or two in length) to make the Markov nodes. During this process I tend to shuffle the subsections around to get a feeling for good points to link them and to find duplicate sections. Eventually I then render the stems out and move on to the code (I use Reaper but any multitrack audio editor would do).
This was the first hint that the project would have to change with the music, because its structure was profoundly different. The original song, Tricka Technology, was very repetitive and self-similar, whereas First Contact only really had redundancy in the chorus-like sections and their interlinks with the rest of the song. So while I could put a lot of the structure into the Markov chain the first time around, this time I began thinking of other ways to represent it.
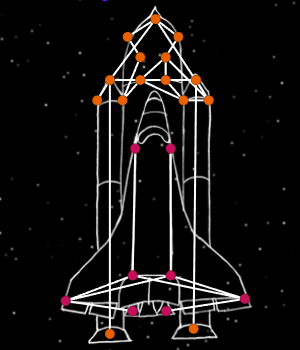
So I started thinking about space. The song is called First Contact, after all, and several of the sections felt to me like they could be imagined as parts of a journey through space in search of life. The start slowly increases in intensity, which feels like a launch countdown. Then there's a sudden explosive transition, like a liftoff, and then a kind of casual cruising vibe. Between that are sections that could easily be stops along the journey. Finally, what really tied it together for me was when I realised that the connections between the Markov nodes bore a lot of resemblance to constellations. From that point, the space metaphor was all I could think about.
I also wanted to rework the beat visualisation from the the original. The original had a kind of flickering effect, but I wanted something with a lot more movement to it. Of course, if the nodes are constellations, the obvious choice would be to use a star. I originally intended to do a standard 5-pointed star, but after some experimentation 9 points was my favourite. I collapsed all the inactive nodes into simple dots, which made the constellation pattern very obvious and added to the contrast between active nodes and inactive ones. Finally, I realised that stars look very boring when all they do is change size, so I made them rock back and forward to the beat as well.
My next step was to rearrange the nodes into recognisable shapes that I could treat as constellations. This took ages, because I was trying to achieve several things at once: I wanted the nodes to reflect the structure of the music, to look nice, to represent some space-themed shape, and to be fairly regular. I spent a lot of time drawing shapes on a whiteboard, and even longer rearranging the shapes on the screen. To help with this, I added a debug tool that would let me drag the nodes around and save their positions.
At that point, the visual metaphor was speaking loud and clear, but it felt like there was something missing. Because of the nature of the song, the chorus section with the spaceship was quite interconnected, but the other sections were all linear. During those linear sections, there wasn't much to look at. Additionally, I wanted to add some sense of depth. The obvious choice was an animated starfield, and the more I thought about it the more it was clear that it should animate with the mood of the music, reinforcing the same imagery used in the constellations.
Finally, the constellations themselves needed a bit more fleshing out, so I sketched some constellation-style line art to go underneath them. My drawing ability was not strictly up to this task, but luckily most constellations are simple line art so I think it came out alright. Finally, with all the pieces together, the whole thing looked exactly the way I imagined it. The space journey was very evident, and most importantly the music felt fun and alive.
There was also a fair bit of technical work in redesigning the code to handle all these new features and track the music reliably. If you're interested in that, you can check out the code on GitHub. Otherwise, enjoy, and check out some more of Keiji Yamagishi's work – he's truly the master of chiptunes, and I consider this work to be a tribute to his.
Occasionally, in the course of my work, or just for fun, I end up learning about something new. I figured in the spirit of student teaching I would summarise the things that I learned. This week: drawing spirals!
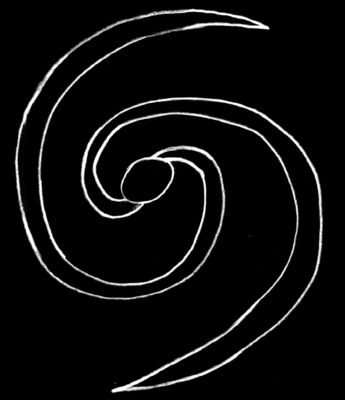
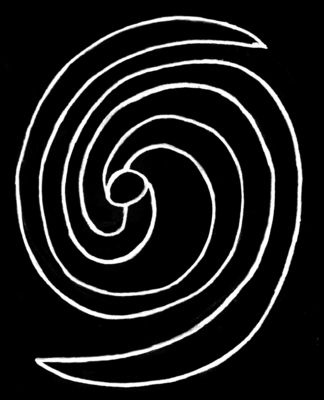
I wanted to draw a spiral galaxy for an upcoming project, so I tried a few different things. This is mostly a cautionary tale about how hard spirals are to draw. Here's my first one:
As you can see, it was pretty wonky. I also quite liked the idea of the spiral having wider arms, like a barred spiral galaxy. So I gave that a try.
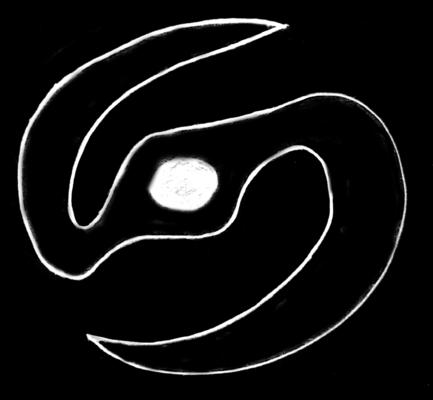
This was, uh, not what I was hoping for. It would have made a pretty good batarang for some alternate-universe Batman, or maybe a very confused Wu-Tang sign. Maybe if I did one filled in?
Nope.
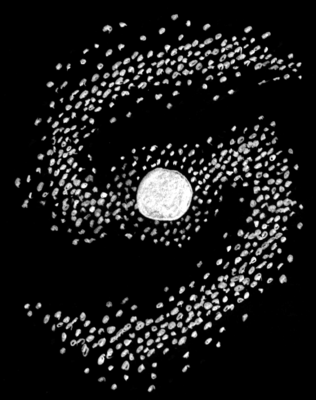
I tried drawing the spiral using dots instead of lines, and actually I really like the way this came out. Unfortunately, everything else in the project was line art, so while this looked good, it was also really out of place.
So then I draw another one kind of like the first one, which worked out okay. And by okay I mean still wonky, but no so wonky that I didn't use it anyway.
Afterwards, I discovered that drawing spirals is actually difficult for everyone (I thought it was just my lack of drawing skills), and that people who want to draw good spirals just use a compass or some approximation thereof. So that's my lesson for the day: check if you actually need to do something the hard way before you do it.
I thought I'd write up the work I did on Brain Light, aka Project Brain, in 2015. I've covered bits of it in earlier posts, but I never actually described the project as a whole. It was a collaboration between myself, artist Laura Jade and neuroscientist Peter Simpson-Young. The goal was to create a sculptural visualisation of brain activity using an EEG headset.
There were some interesting challenges to this project. Firstly, I wanted to be sure that the setup would be reliable. Too many art installations run on laptops with custom programs you have to fiddle with and set up in a particular way before you can get anything going. That's not just a matter of adding complexity for the artist, there's also a good deal of practical, selfish motivation; I didn't want to have to be there every time it was running. Basically, I wanted it to act like hardware, not software. For this reason, I very quickly settled on using a Raspberry Pi. They're replaceable (we bought 3), relatively cheap, and powerful enough for the kind of processing we wanted to do.
Unfortunately, the Epoc platform is not great. Despite the majority of their users being researchers and hobbyists, they have a tragically closed-platform mindset. You pay extra for installing the SDK on different platforms, nothing is open source, you just get a big binary blob and hope it works on your hardware. Since the SDK wasn't working on the Pi (or any ARM hardware) and their general platform strategy gave me the creeps, I decided to go it alone and just use the raw data. You have to pay extra to do this, but it seemed worthwhile given that it removed our dependency on their platform.
Free to use whatever software I wanted, I quickly settled on Python. Python is portable, easy to write, reasonably fast, and most importantly has a big following in the scientific community. I got the data in via a library called Emokit, and from there I really had free reign over any kind of signal processing SciPy had to offer. It took a bit longer doing it this way, because I had to learn what each of the components did rather than just using something off the shelf, but that understanding was actually helpful in the long run when I wanted to make changes.
With the data processing under control, it was really a matter of what to do with it. The main thing was to experiment, visualise and try different options so we could figure out what would look best on the sculpture. To give us that flexibility, I made the various processing components separate: one component handled reading the data off the device, another did the processing to turn that into brain frequencies, another summed those frequency regions up into bands, and so on. These were all separate processes connected together via zeromq sockets, and they could be started or stopped at any time.
Finally, on top of that, I made a web interface to show us various kinds of substantially non-artistic debug output. This included the full frequency chart, as well as sensor contact quality info for positioning the headset. I also added an example brain ball visualisation that substantially informed the final version. Later on, I added a couple other kinds of output, audio and some nifty non-linear measurements like fractal dimension and entropy. Although these were interesting and indicative, the ultimate goal was to light up the perspex sculpture.
We had originally planned to light the brain using bright LEDs and optic fibre, but it turned out to be very difficult to find RGB LEDs that were bright enough while still being individually addressible. We wanted something that we could run off DMX, which also made it more difficult. Something Arduino-based like NeoPixels would have been a possibility, but would also have involved more custom hardware and more ways for things to go wrong. In the end we just used a big projector mounted above the brain and projected the light directly on it.
For that to work, we needed the Pi to put out some nice graphics over HDMI. Out of the various drawing options, I eventually went with raw OpenGL (via pyopengles). I didn't want to have a whole X server and all its associated bloat, especially given the EEG processing was a substantial load on the Pi already. I figured that if I could write the visualisation directly in shaders, it would run pretty fast while still looking good. The shaders turned out to be pretty tricky. I initially wanted to do a more complex particle system, but I settled on a pretty neat cellular automata system.
The final visualisation was kind of a mashup of the cellular automata and the original brain ball with a bunch of tweaks on top. Instead of being smooth gradients, the colours needed to be sharp contrasts so that they would show up well on the perspex. The projector was also mounted on an angle, so the perspective of the visualisation had to change from top-down to side-on. Finally, there was a lot of tweaking with Laura to find the best colour values, automata speeds, sizes, positions, and so on. This was actually quite a fun process because all the hard work was done, and I could just rely on her aesthetic judgement while I concentrated on fiddling with numbers.
All up, the project went quite well. It had an exhibition at Culture at Work, and appeared at events in the Powerhouse Museum and Museum of Contemporary Art. It also got some nice press from Vice and The Telegraph, and even ended up on ABC's Catalyst (as did Peter). My original goal of it being low-maintenance was also a success; I didn't touch it during the entire exhibition run, and I believe it's now on tour in Europe without needing any nightmare intercontinental tech support.
A year ago, I wrote The universe has no clothes, describing the way that, when your attempts to understand a system fail enough times, you stop believing that the system has any rules at all. This is the process that leads to users getting frustrated and just trying stuff at random. After all, there are no rules, no logic, why not just do whatever and see what happens?
I've been reflecting recently on the post-truth concept. How is it that untruthfulness is not even just something you can get away with, but a viable, even preferable political strategy? I think a lot of it comes down to how knowledge works in the information age. I wrote a bit about this in Concentrate; as we've gone from having limited to unlimited information, the tools and strategies we use with information have to change.
So here's the question: how do you lie when everyone knows the truth? You can't just make up an outright falsehood in the hope that nobody will bother to check; we don't live in that world anymore. Within minutes, not only will people have found information refuting your lie, they will also put up new information specifically calling out your lie to save others the effort. Historically you could hide the truth, or silence it, but on the internet that doesn't work, and often has the opposite effect.
But while we have unlimited information, we still have profoundly limited brains. To lie effectively today, you can't attack the facts, you have to attack people's understanding of them. You need to sabotage the character of the facts, exploit cognitive biases to prevent people from believing them and, above all, generate enough lies and present them confidently enough that it's no longer clear who's lying.
It's this last thing that I believe is the biggest driver of the post-truth phenomenon, and I think it exploits that exact same way you can lose faith that a system has rules or internal logic. You have some system for figuring out what the truth is, maybe it's who says it, maybe it's the language they use or the sources they cite, and that system mostly works. But what about when the noise level increases and your system has to cope with more data than you can handle?
You see a thousand articles, half of them say global warming is real, the other half say it's a lie. Are you going to read them all? You see a well-written post on a political topic, but then you read a well-written reply, then there's another reply, and another... Like two people arguing back and forth in front of you, you slowly tune out and decide it's not worth the bother.
When the system that tells you what's true stops giving you answers, you stop believing in it. You don't think one thing is true and the other false, you think both are "I dunno". And that to me is the essence of post-truth as a strategy, it's about raising the noise floor to the point where nobody knows anything. In that factual vacuum, it's much easier to get people to believe what you want. After all, there's no truth, no facts, why not just believe whatever and see what happens?
This is a write-up for Shifting into Consciousness, a project I worked on with Helen Amanatiadis and Culture at Work. The goal was to have a pressure-sensitive mat that would wirelessly trigger a wall-mounted box to spray perfume in the air and blow it around with a fan. I came in fairly late on the project to help out with the technical side of things, so most of the hardware had been specced out already, but there were some pretty interesting challenges getting it all to work.
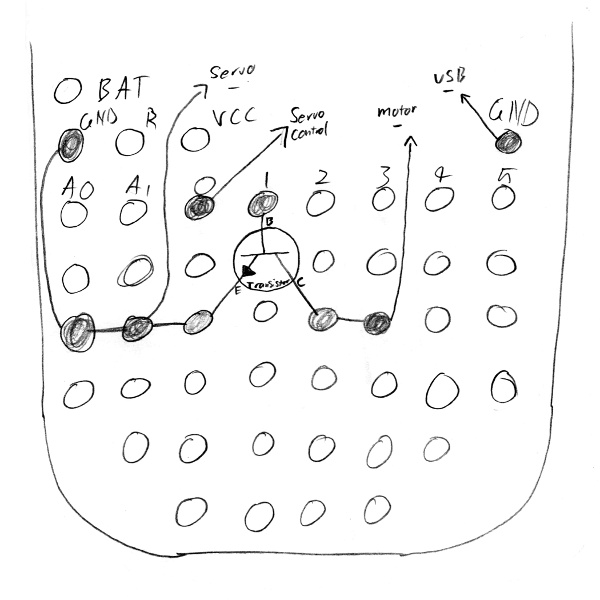
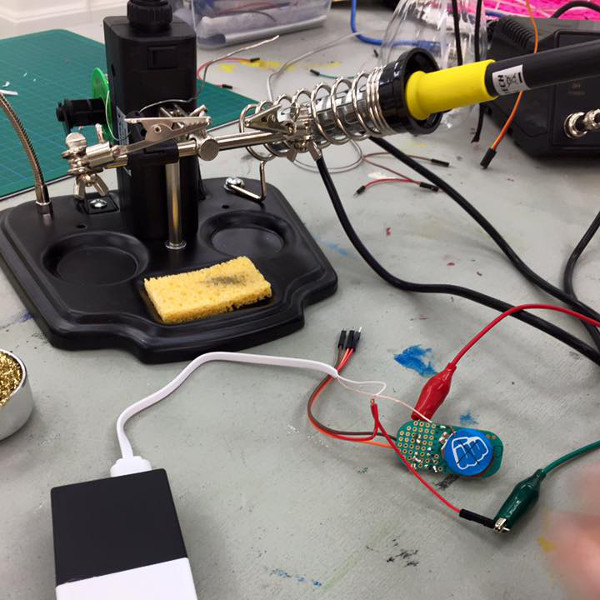
The main brains of the project was the LightBlue Bean, an Arduino-style programmable Bluetooth Low-Energy module. We had two per piece, one for the mat and one for the wall box, and four pieces, so eight beans total. The floor beans were triggered by a sheet of velostat. They would then send a signal to their respective wall beans, and those beans would then activate a servo (to squeeze the perfume bottle) and a motor (to spin the fan). The beans were powered by little coin-cell batteries (they're very power-efficient), but the servo and motor were powered by a separate 5v USB battery pack.
The first challenge was getting the beans to talk to one another. Bluetooth Low-Energy expects one primary device and many secondary devices connecting to it. Ideally, the wall bean could have acted as the primary, but the beans can't do that. Instead, we added a Raspberry Pi to act as a central router. All the beans connected to the Pi, and the Pi had an internal table of which beans' messages should go to which.
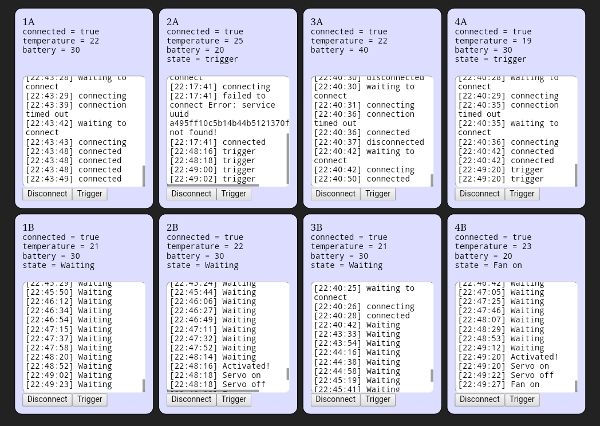
Although this added some complexity, it perhaps turned out for the best, because it made the whole system a lot more debuggable. If the beans were just connected to each other it would have been a bit tricky to figure out why one wasn't triggering. Is it a problem with the mat? Is the Bluetooth disconnected? Has the battery run out? Having a central server meant that the individual beans could send debug information to it as they operate, and even be manually triggered if needed. I put together a neat web interface to do this, which was probably the highlight of the project.
The second challenge was the USB battery packs. While they were relatively cheap and easy to interface with (we just cut up the USB cables they came with), they are really designed for high-current charging, and often shut off if you draw too little current from them. Because the motor and servo were inactive most of the time, the packs would just turn off. You can solve it with some clever electronics to set up a pulsed load, but there wasn't really time to do that. Instead, I set up the servos to switch on periodically and wiggle back and forth to waste some power. This worked well enough, but it required a lot of tuning.
The last challenge was the complexity of switching DC motors at low voltage. I'd never previously done much with motors, so this was a bit of a surprise to me. The existing setup had been done by someone else and used a transistor with far too low a current rating, no flyback diode and no base resistor. Any one of those could have blown the transistor at any time but, as these things tend to go, it only happened the night before the exhibition opened. Once I realised what was wrong I went and frantically learned about transistors, but it was really too late at that point.
So unfortunately, we went to exhibition without the fans working, but the servos worked great and the Bluetooth communication via the Pi was surprisingly solid. You can find some more technical details and code in the prototypewrapups I did while I was working on it.