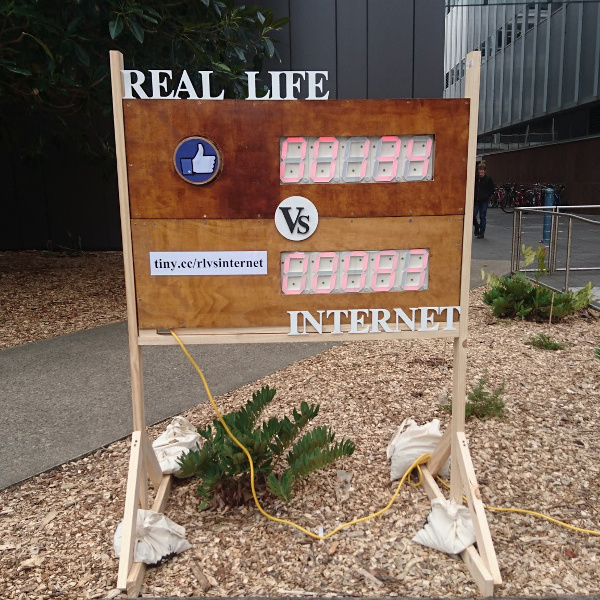
Real Life vs Internet
This is a write-up for Real Life vs Internet, a project I just finished for the UNSW Artsweek. The brief was in some way to bring the concept of liking things on Facebook into the real world. I quite liked the absurdity of it: in real life you can like stuff just by enjoying it, but on Facebook you do it by clicking a button. Can we bring button-pressing-as-affection to the physical world?
I proposed we go one step further and see which people would click more: an internet Like button or a real-life Like button. This would involve building two parallel systems: one online and one physical, both updating in real time. Like many university-related things, the timeline was pretty short: in this case, about a week from concept to finished product, of which 4 days was building the thing.
The first thing we needed was to figure out the hardware. I was most nervous about this because I'm not super electronicsy (occasional Shenzhen binges notwithstanding) and I was worried I'd get in over my head with wiring or not enough capacitors or whatever. I spent a long time daydreaming about a fully mechanical counter before I bit the bullet and decided to go full electronic.
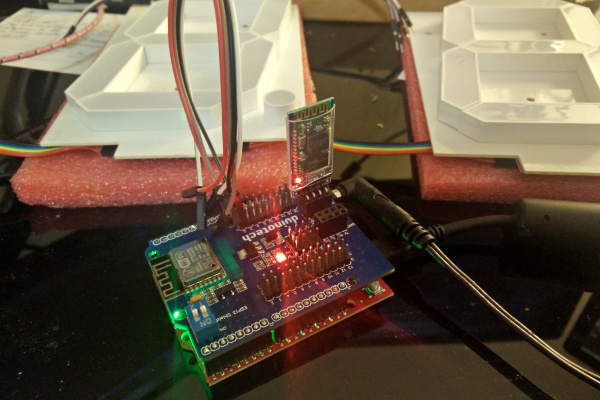
I owe a debt to the enormous DIY maker scene, because prebuilt LED panels are expensive and driving 10x7 segments (= 70 wires) sounds like no fun at all. Thankfully Sparkfun sells a big 7-segment display and a chainable control board designed to solder on to the back of it with a shift register that lets you turn those 70 wires into 6.
The other hardware question was how I was going to drive this thing and get it hooked up to the internet. An Arduino was a no-brainer for driving it, especially since Sparkfun had fairly detailed instructions with sample Arduino code. I'm sure I could have figured it out from scratch on another platform but this seemed like the path of least resistance.
Then I needed to get the Arduino connected to wifi. I'd previously used ESP8266 chips, and that seemed like the way to go here. I was originally intending to wire the ESP to the Arduino manually, but in the interests of expediency I grabbed a plug-and-play ESP Shield from Jaycar. The thing had no documentation but it was basically fine once I managed to flash it to the nifty NodeMCU firmware.
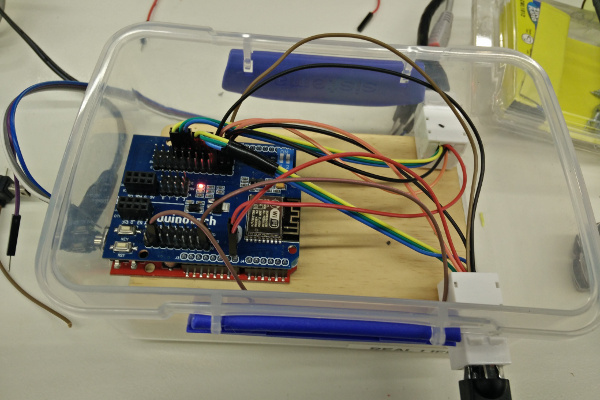
The last step was to figure out how all the wiring was going to work. I knew I'd want two separate runs of panels (one for real life, one for internet), and that they might be some distance from the central logic board, but I didn't know exactly where. Also, this was going to be an outdoor installation, and I wanted the electronics to stay fairly isolated from everything else in case of damp.
After dithering on this for a while, I eventually decided to use cat6 network cables. They're neat and modular, and some investigating suggested that the wire gauge of cat6 is thick enough that they wouldn't waste a lot of current or melt. I even found these neat-if-overpriced keystone jacks designed for wall sockets, but also worked pretty well as wire breakouts. I put everything in a faux-tupperware clippy plastic lunchbox and dremeled the holes I needed.
While I was doing this, my co-conspirator (and Artsweek coordinator) Jeeves was building the physical panelling. This was basically a pair of large boxes with mounting windows for the digit displays, as well as a big button made from some springs and lengths of plumbing pipe. I don't know if there's a place where you can buy giant buttons off the shelf, but we couldn't find one and the macguyver plumbing pipe monstrosity worked surprisingly well.
We ended up putting all the control hardware inside the lower box and running one of the network cables up into the upper box. I considered this somewhat of a vindication of my cabling approach, because running 6 individual wires up there would have been really annoying. We did run two wires from the ethernet jack to the button contacts though.
Although I'm sure it would have been the opposite for an electrical engineer, I found the electronics and build the challenging part and the software comparatively easy. I put together an Arduino sketch to drive the two sets of panels and accept button inputs. Altough the ESP was its own separate microcontroller, I decided the best way to do it was keep all the state and logic on the Arduino, and leave the ESP as basically a dumb data channel.
This means that with the ESP malfunctioning or removed the whole thing would still operate. There's not even a particular necessity for it to be an ESP; they're connected via serial, so anything that can send and receive data could be wired into it. I liked this super modular approach for its prototype-friendliness, and you can get a bit more detail about it in my recent prototype wrapup.

The last part was to build the website. This wasn't too hard either, and as is usually the case with these things I spent most of my time fiddling with formatting and fonts and other silly stuff. The core part was that I wanted the online and offline versions to mirror each other as closely as possible. I used websockets for this, and set it up so everyone shared a 1-second cooldown for button presses. The offline button had the same restriction to make it fair.
The server was just a little Nodejs/Coffeescript thing that dumped data into a redis database, and the client was plain Coffeescript with no extra libraries. Luckily the UI was pretty unchallenging because it was going to be embedded in an iframe on the Artsweek page. Still, it was important to make the live updates and clicking look good.
Finally, with everything written and hooked up, we were ready to go. The website pointed people to the physical button using Google Maps. The physical location pointed people to the link for the online button. There was some last-minute scariness because it turned out the university's WPA2 Enterprise wifi wasn't supported by NodeMCU, so we ended up using a mobile hotspot to get it connected. The display was also a little less visible outdoors than I hoped, but it's pretty tough to beat the Australian sun. Jeeves suggested that recessing the panels more would help, which seems like a good idea.
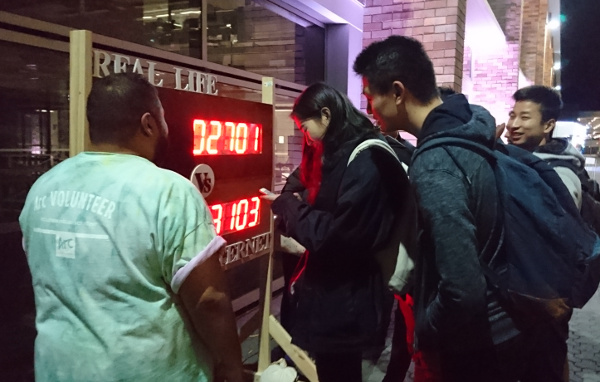
Ultimately, though, there were no more technical issues for the rest of the event, and people seemed to have a good time playing with it and watching it update. The last hour or so it was moved to the laneway party for the end of Artsweek, and in the leadup to the final 10pm cutoff things got pretty fierce.
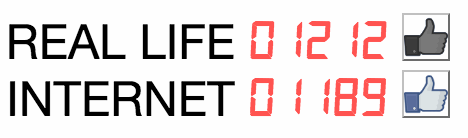
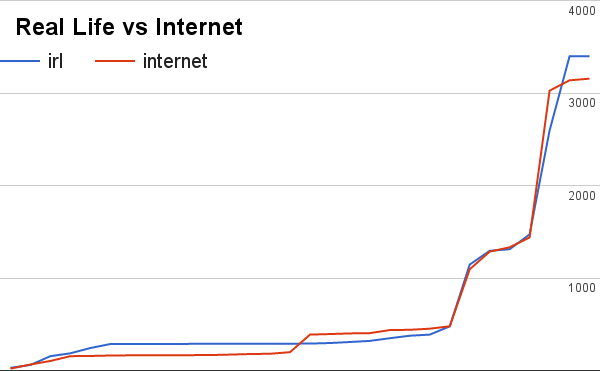
I was secretly hoping for a victory for Team Internet, but Team Real Life were just more dedicated (or maybe Team Internet got distracted by the internet), In the end, irl won the day.
All told, I'd say the project was a success and pretty fun to work on. If you're interested in doing something similar, or just like reading prototype code for fun, you can find everything on GitHub.